26 KiB
Microservice Tutorial Part 05: Building the Ordering service
//[doc-params]
{
    "UI": ["MVC","Blazor","BlazorServer", "BlazorWebApp", "NG"],
    "DB": ["EF","Mongo"]
}
//[doc-nav]
{
  "Previous": {
    "Name": "Creating the initial Ordering service",
    "Path": "tutorials/microservice/part-04"
  },
  "Next": {
    "Name": "Integrating the services: HTTP API Calls",
    "Path": "tutorials/microservice/part-06"
  }
}
In the previous part, we created the Ordering microservice. In this part, we will implement the functionality of the Ordering microservice manually. We will not use ABP Suite to generate the code. Instead, we will create the necessary code step by step to understand the details better.
Creating the Order Entity
We will start by creating the Order entity, which will represent an order in our system. We'll add this entity to the CloudCrm.OrderingService project. Create a new folder named Entities and create a file Order.cs inside it:
using CloudCrm.OrderingService.Enums;
using Volo.Abp.Domain.Entities.Auditing;

namespace CloudCrm.OrderingService.Entities;

public class Order : CreationAuditedAggregateRoot<Guid>
{
    public Guid ProductId { get; set; }
    public string CustomerName { get; set; }
    public OrderState State { get; set; }
}
To keep this example simple, we allow users to include only a single product within an order. The Order entity inherits from the CreationAuditedAggregateRoot<> class. This class, provided by the ABP Framework, includes common properties like Id, CreationTime, CreatorId, etc.
Adding the OrderState Enum
We also need to define the OrderState enum. In the CloudCrm.OrderingService.Contracts project, create a folder named Enums and create a file OrderState.cs inside it:
namespace CloudCrm.OrderingService.Enums;

public enum OrderState : byte
{
    Placed = 0,
    Delivered = 1,
    Canceled = 2
}
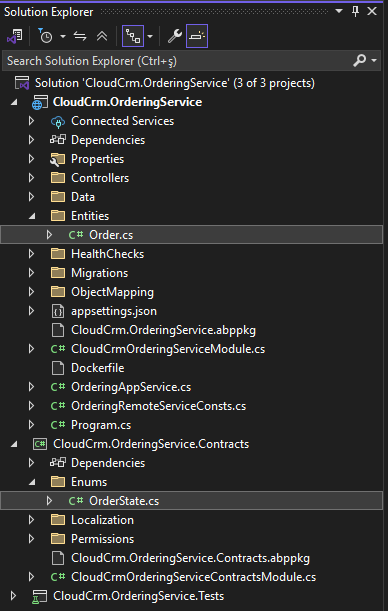
The final solution structure should look like this:
Configuring the Database Mapping
First, we need to add the Order entity to the OrderingServiceDbContext class. Open the OrderingServiceDbContext class in the CloudCrm.OrderingService project, located in the Data folder, and add the following code to the DbSet properties:
using CloudCrm.OrderingService.Entities;
using Microsoft.EntityFrameworkCore;
using Volo.Abp.Data;
using Volo.Abp.EntityFrameworkCore;
using Volo.Abp.EntityFrameworkCore.DistributedEvents;
using Volo.Abp.EntityFrameworkCore.Modeling;

namespace CloudCrm.OrderingService.Data;

[ConnectionStringName(DatabaseName)]
public class OrderingServiceDbContext :
    AbpDbContext<OrderingServiceDbContext>,
    IHasEventInbox,
    IHasEventOutbox
{
    public const string DbTablePrefix = "";
    public const string DbSchema = null;

    public const string DatabaseName = "OrderingService";

    public DbSet<IncomingEventRecord> IncomingEvents { get; set; }
    public DbSet<OutgoingEventRecord> OutgoingEvents { get; set; }
    public DbSet<Order> Orders { get; set; } // NEW: ADD DBSET PROPERTY

    // Code omitted for brevity
}
Next, we need to configure the database mapping for the Order entity. We'll use the EF Core Fluent API for this configuration. In the OrderingServiceDbContext class add the following code to the OnModelCreating method:
protected override void OnModelCreating(ModelBuilder builder)
{
    base.OnModelCreating(builder);

    builder.ConfigureEventInbox();
    builder.ConfigureEventOutbox();

    builder.Entity<Order>(b =>
    {
        // Configure table name
        b.ToTable("Orders");

        // Always call this method to set base entity properties
        b.ConfigureByConvention();

        // Properties of the entity
        b.Property(q => q.CustomerName).IsRequired().HasMaxLength(120);
    });
}
In this code snippet, we configure the Order entity to use the Orders table in the database. We also specify that the CustomerName property is required and has a maximum length of 120 characters.
Add a Database Migration
Now, we can add a new database migration. You can use Entity Framework Core's Add-Migration (or dotnet ef migrations add) terminal command, but in this tutorial, we will use ABP Studio's shortcut UI.
Please stop the applications if they are running and ensure that the solution has built. You can right-click the CloudCrm.OrderingService (under the services folder) on ABP Studio Solution Explorer and select the Dotnet CLI -> Graph Build command.
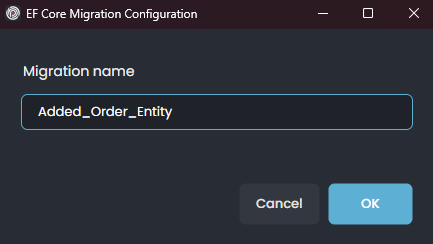
Right-click the CloudCrm.OrderingService package and select the EF Core CLI -> Add Migration command:

The Add Migration command opens a new dialog to get a migration name Added_Order_Entity:
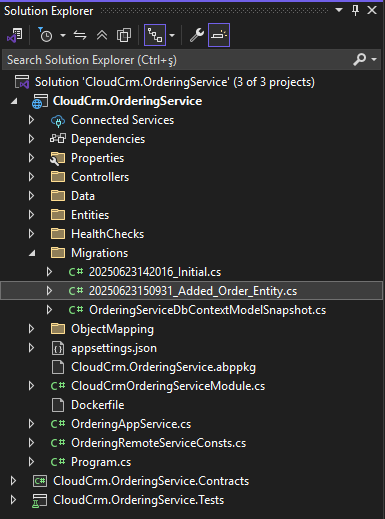
Once you click the OK button, a new database migration class is added to the Migrations folder of the CloudCrm.OrderingService project:
The changes will be applied to the database during the next application startup. For more details, refer to the database migrations on service startup section.
Creating the Application Service
Now, we will create the application service to manage the Order entity.
Defining the Application Service Contract
First, we need to define the application service contract under the CloudCrm.OrderingService.Contracts project. Return to your IDE, open the CloudCrm.OrderingService module's .NET solution and create an IOrderAppService interface under the Services folder for the CloudCrm.OrderingService.Contracts project:
using System.Collections.Generic;
using System.Threading.Tasks;
using Volo.Abp.Application.Services;

namespace CloudCrm.OrderingService.Services;

public interface IOrderAppService : IApplicationService
{
    Task<List<OrderDto>> GetListAsync();
    Task CreateAsync(OrderCreationDto input);
}
Defining the Data Transfer Objects
Next, we need to define the data transfer objects (DTOs) for the Order entity. The GetListAsync and CreateAsync methods will use these DTOs to communicate with the client applications.
Create a OrderCreationDto class under the Services folder in the CloudCrm.OrderingService.Contracts project:
using System;
using System.ComponentModel.DataAnnotations;

namespace CloudCrm.OrderingService.Services;

public class OrderCreationDto
{
    [Required]
    [StringLength(150)]
    public string CustomerName { get; set; }

    [Required]
    public Guid ProductId { get; set; }
}
Create a OrderDto class under the Services folder in the CloudCrm.OrderingService.Contracts project:
using System;
using CloudCrm.OrderingService.Enums;

namespace CloudCrm.OrderingService.Services;

public class OrderDto
{
    public Guid Id { get; set; }
    public string CustomerName { get; set; }
    public Guid ProductId { get; set; }
    public OrderState State { get; set; }
}
The final solution structure should look like this:

Implementing the Application Service
Now, we will implement the IOrderAppService interface in the OrderAppService class. Create an OrderAppService class under the Services folder in the CloudCrm.OrderingService project:
using System;
using System.Collections.Generic;
using CloudCrm.OrderingService.Entities;
using CloudCrm.OrderingService.Enums;
using CloudCrm.OrderingService.Localization;
using Volo.Abp.Application.Services;
using Volo.Abp.Domain.Repositories;

namespace CloudCrm.OrderingService.Services;

public class OrderAppService : ApplicationService, IOrderAppService
{
    private readonly IRepository<Order, Guid>  _orderRepository;

    public OrderAppService(IRepository<Order, Guid> orderRepository)
    {
        LocalizationResource = typeof(OrderingServiceResource);
        _orderRepository = orderRepository;
    }

    public async Task<List<OrderDto>> GetListAsync()
    {
        var orders = await _orderRepository.GetListAsync();
        return ObjectMapper.Map<List<Order>, List<OrderDto>>(orders);
    }

    public async Task CreateAsync(OrderCreationDto input)
    {
        var order = new Order
        {
            CustomerName = input.CustomerName,
            ProductId = input.ProductId,
            State = OrderState.Placed
        };

        await _orderRepository.InsertAsync(order);
    }
}
In this code snippet, we inject the IRepository<Order, Guid> into the OrderAppService class. We use this repository to interact with the Order entity. The GetListAsync method retrieves a list of orders from the database and maps them to the OrderDto class. The CreateAsync method creates a new order entity and inserts it into the database.
Afterward, we need to configure the Mapperly object to map the Order entity to the OrderDto class. Open the OrderingServiceApplicationMappers class in the CloudCrm.OrderingService project, located in the ObjectMapping folder, and add the following code:
using Riok.Mapperly.Abstractions;
using Volo.Abp.Mapperly;

namespace CloudCrm.OrderingService.ObjectMapping;

[Mapper]
public partial class OrderingServiceApplicationMappers : MapperBase<Order, OrderDto>
{
    public override partial OrderDto Map(Order source);

    public override partial void Map(Order source, OrderDto destination);
}
Testing the Application Service
Now, we can test the OrderAppService class using the Swagger UI. Open the Solution Runner and right-click to CloudCrm.OrderingService project and select the Start command. After the application starts, you can open the Swagger UI by clicking to the Browse command:

Expand the api/ordering/order API and click the Try it out button. Then, create a few orders by filling in the request body and clicking the Execute button:

If you check the database, you should see the entities created in the Orders table:

Since we're using the Auto API Controller we don't need to create a controller for the
OrderAppService. The ABP Framework automatically creates an API controller for theOrderAppServiceclass. You can find the configuration in theCloudCrmOrderingServiceModuleclass, in theConfigureAutoControllersmethod of theCloudCrm.OrderingServiceproject.
Creating the User Interface
{{if UI == "MVC"}}
Now, we will create the user interface for the Ordering module. We will use the CloudCrm.Web project to create the user interface. Open the CloudCrm.Web .NET solution in your favorite IDE.
Creating the Orders Page
Create a new Orders folder under the Pages folder in the CloudCrm.Web project. Then, create an Index.cshtml Razor Page inside that new folder and edit the Index.cshtml.cs file as follows:
using CloudCrm.OrderingService.Services;
using Microsoft.AspNetCore.Mvc.RazorPages;
using Volo.Abp.AspNetCore.Mvc.UI.RazorPages;

namespace CloudCrm.Web.Pages.Orders;

public class Index : AbpPageModel
{
    public List<OrderDto> Orders { get; set; }

    private readonly IOrderAppService _orderAppService;

    public Index(IOrderAppService orderAppService)
    {
        _orderAppService = orderAppService;
    }

    public async Task OnGetAsync()
    {
        Orders = await _orderAppService.GetListAsync();
    }
}
Here, we inject the IOrderAppService into the Index Razor Page. We use this service to retrieve the list of orders from the database and assign them to the Orders property. Open the Index.cshtml file and add the following code:
@page
@model CloudCrm.Web.Pages.Orders.Index

<h1>Orders</h1>

<abp-card>
    <abp-card-body>
        <abp-list-group>
            @foreach (var order in Model.Orders)
            {
                <abp-list-group-item>
                    <strong>Customer:</strong> @order.CustomerName <br />
                    <strong>Product:</strong> @order.ProductId <br />
                    <strong>State:</strong> @order.State
                </abp-list-group-item>
            }
        </abp-list-group>
    </abp-card-body>
</abp-card>
This page shows a list of orders on the UI. We haven't created a UI to create new orders, and we will not do it to keep this tutorial simple. If you want to learn how to create advanced UIs with ABP, please follow the Book Store tutorial. {{end}}
{{if UI == "Blazor" || UI == "BlazorServer" || UI == "BlazorWebApp"}}
Now, we will create the user interface for the Ordering module. We will use the {{if UI == "BlazorServer"}} CloudCrm.Blazor.Server {{else}} CloudCrm.Blazor.Client {{end}} project to create the user interface. Open the {{if UI == "BlazorServer"}} CloudCrm.Blazor.Server {{else}} CloudCrm.Blazor.Client {{end}} .NET solution in your favorite IDE.
Creating the Orders Page
{{if UI == "BlazorServer"}}
Create Orders.razor file under the Components/Pages folder in the CloudCrm.Blazor.Server project.
{{else}}
Create Orders.razor file under the Pages folder in the CloudCrm.Blazor.Client project.
{{end}}
@page "/orders"
@using CloudCrm.OrderingService.Services
@inject IOrderAppService OrderAppService

<h1>Orders</h1>

<div class="card">
    <div class="card-body">
        @if (OrderList == null)
        {
            <p><em>Loading orders...</em></p>
        }
        else if (!OrderList.Any())
        {
            <p><em>No orders found.</em></p>
        }
        else
        {
            <ul class="list-group">
                @foreach (var order in OrderList)
                {
                    <li class="list-group-item">
                        <strong>Customer:</strong> @order.CustomerName <br />
                        <strong>Product:</strong> @order.ProductId <br />
                        <strong>State:</strong> @order.State
                    </li>
                }
            </ul>
        }
    </div>
</div>

@code {
    private List<OrderDto> OrderList { get; set; }

    protected override async Task OnInitializedAsync()
    {
        try
        {
            var result = await OrderAppService.GetListAsync();
            OrderList = result;
        }
        catch (Exception ex)
        {
            Console.WriteLine($"Error loading orders: {ex.Message}");
            OrderList = new List<OrderDto>();
        }
    }
}
{{end}}
{{if UI == "MVC" || UI == "Blazor" || UI == "BlazorServer" || UI == "BlazorWebApp"}}
Generating the UI Proxy
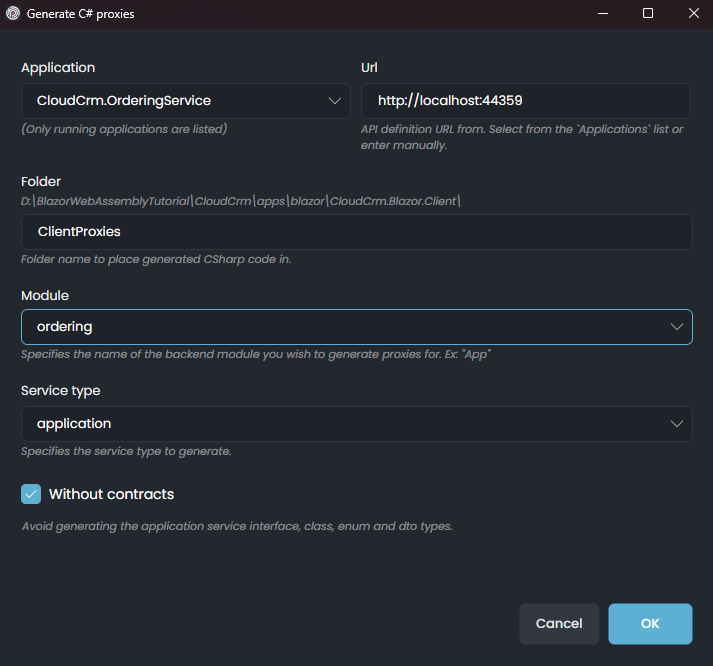
To select the Application during proxy generation, ensure that the CloudCrm.OrderingService is Started beforehand. You can start the application using Solution Runner.
{{if UI == "BlazorWebApp"}}
Now, we need to generate the Static API Proxy for the UI project. Since we are using BlazorWebApp, we will generate client proxies in both the CloudCrm.Blazor and CloudCrm.Blazor.Client projects, as pages are sometimes rendered on the server side and sometimes on the client side.
For the Server Project

This will open the Generate C# Proxies window. Select the CloudCrm.CatalogService application this will automatically fill in the URL field. Next, choose the catalog module, set the service type to Application, and check the Without contracts option, since the CloudCrm.Blazor project already references the CloudCrm.CatalogService.Contracts package.
For client project
This will open the Generate C# Proxies window. Select the CloudCrm.CatalogService application this will automatically fill in the URL field. Next, choose the catalog module, set the service type to Application, and check the Without contracts option, since the CloudCrm.Blazor.Client project already references the CloudCrm.CatalogService.Contracts package.
{{else}}
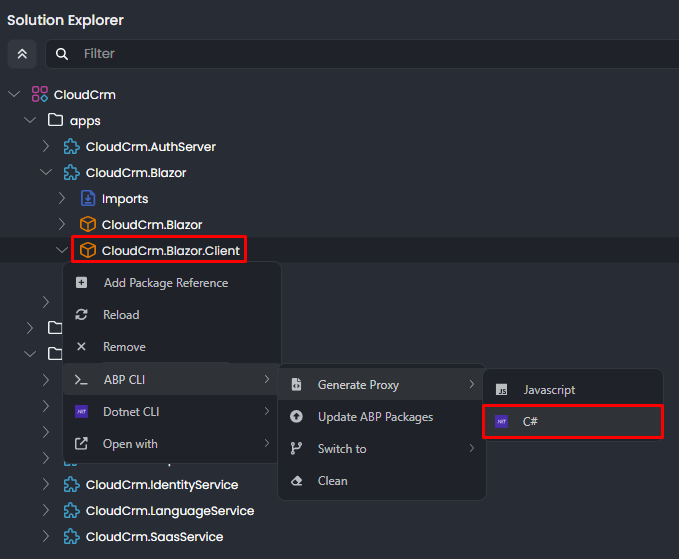
Now, we need to generate the Static API Proxy for the UI project. Right-click the {{if UI == "MVC"}} CloudCrm.Web {{else if UI == "BlazorServer"}} CloudCrm.Blazor.Server {{else if UI == "Blazor"}} CloudCrm.Blazor.Client {{end}} package and select the ABP CLI -> Generate Proxy -> C# command:
{{if UI == "MVC"}}
 {{else if UI == "BlazorServer"}}
 {{else if UI == "Blazor"}}
 {{end}}
{{end}}
It will open the Generate C# Proxies window. Select the CloudCrm.OrderingService application, and it will automatically populate the URL field. Choose the ordering module and service type is application lastly check the Without contracts checkbox, since we already have a dependency on the CloudCrm.OrderingService.Contracts package in the {{if UI == "MVC"}} CloudCrm.Web {{else if UI == "BlazorServer"}} CloudCrm.Blazor.Server {{else if UI == "Blazor"}} CloudCrm.Blazor.Client {{end}} project:
Adding the Menu Item
ABP provides a modular navigation menu system that allows you to define the menu items in a modular way.
Finally, we need to add a menu item to the sidebar to navigate to the Orders page. Open the CloudCrmMenus file in the Navigation folder of the {{if UI == "MVC"}} CloudCrm.Web {{else}} CloudCrm.Blazor.Client {{end}} project and edit with the following code:
namespace CloudCrm.Web.Navigation;

public class CloudCrmMenus
{
    private const string Prefix = "CloudCrm";

    public const string Home = Prefix + ".Home";

    public const string HostDashboard = Prefix + ".HostDashboard";

    public const string TenantDashboard = Prefix + ".TenantDashboard";

    public const string Products = Prefix + ".Products";

    public const string Orders = Prefix + ".Orders"; // NEW: ADD MENU ITEM
}
Then, open the CloudCrmMenuContributor class in the {{if UI == "MVC"}} CloudCrm.Web {{else}} CloudCrm.Blazor {{end}} project, located in the Navigation folder, and add the following code to ConfigureMainMenuAsync method:
private static async Task ConfigureMainMenuAsync(MenuConfigurationContext context)
{
    // Code omitted for brevity

    context.Menu.AddItem(
            new ApplicationMenuItem(
                CloudCrmMenus.Orders, // Unique menu id
                "Orders", // Menu display text
                "~/Orders", // URL
                "fa-solid fa-basket-shopping" // Icon CSS class
            )
        );
}
{{end}}
{{if UI == "NG"}}
Generating the Proxies
Run the following command line under the Angular project folder to generate the UI proxy for the OrderingService:
abp generate-proxy -t ng -m ordering -u http://localhost:44311 --target ordering-service
Make sure the url port (example 44311) must be same with your OrderService's port.
For more information, please refer to the Service Proxies documentation.
Add Order Route
- Create
order-base.routes.tsfile under theprojects/ordering-service/config/src/providersfolder and add the following code:
order-base.routes.ts
import { ABP, eLayoutType } from '@abp/ng.core';

import { eOrderingServiceRouteNames } from '../enums/route-names';

export const ORDER_BASE_ROUTES: ABP.Route[] = [
  {
    path: '/ordering-service/orders',
    parentName: eOrderingServiceRouteNames.OrderingService,
    name: 'OrderingService::Menu:Orders',
    layout: eLayoutType.application,
    breadcrumbText: 'OrderingService::Orders',
  },
];
- Create
order-route.provider.tsfile under theprojects/ordering-service/config/src/providersfolder and add the following code:
order-route.provider.ts
import { inject, provideAppInitializer } from '@angular/core';
import { ABP, RoutesService } from '@abp/ng.core';
import { ORDER_BASE_ROUTES } from './order-base.routes';

export const ORDERS_ORDER_ROUTE_PROVIDER = [
  provideAppInitializer(() => {
    configureRoutes();
  }),
];

function configureRoutes() {
  const routesService = inject(RoutesService);
  const routes: ABP.Route[] = [...ORDER_BASE_ROUTES];
  routesService.add(routes);
}
- Open the
projects/ordering-service/config/src/providers/route.provider.tsfile and addORDERS_ORDER_ROUTE_PROVIDERto theORDER_SERVICE_PROVIDERSarray as following code:
route.provider.ts
import { eLayoutType, RoutesService } from '@abp/ng.core';
import {
  EnvironmentProviders,
  inject,
  makeEnvironmentProviders,
  provideAppInitializer,
} from '@angular/core';
import { eOrderingServiceRouteNames } from '../enums/route-names';
import { ORDERS_ORDER_ROUTE_PROVIDER } from './order-route.provider';


export const ORDER_SERVICE_ROUTE_PROVIDERS = [
  provideAppInitializer(() => {
    configureRoutes();
  }),
];

export function configureRoutes() {
  const routesService = inject(RoutesService);
  routesService.add([
    {
      path: '/order-service',
      name: eOrderingServiceRouteNames.OrderService,
      iconClass: 'fas fa-book',
      layout: eLayoutType.application,
      order: 3,
    },
  ]);
}

const ORDER_SERVICE_PROVIDERS: EnvironmentProviders[] = [
  ...ORDER_SERVICE_ROUTE_PROVIDERS,
  ...ORDERS_ORDER_ROUTE_PROVIDER
];

export function provideOrderService() {
  return makeEnvironmentProviders(ORDER_SERVICE_PROVIDERS);
}
- Do not forget adding
provideOrderService()to the providers insideapp.config.tsas follows:
import { provideOrderService } from '@order-service/config';

export const appConfig: ApplicationConfig = {
  providers: [
    // ...
    provideOrderService()
  ],
};
- Lastly, you need to update the
APP_ROUTESarray inapp.routes.tsfile as follows:
// app.routes.ts
export const APP_ROUTES: Routes = [
  // ...
  {
    path: 'order-service',
    children: ORDER_SERVICE_ROUTES,
  },
];
// order-service.routes.ts
export const ORDER_SERVICE_ROUTES: Routes = [
  {
    path: '',
    pathMatch: 'full',
    component: RouterOutletComponent,
  },
  { path: 'orders', children: ORDER_ROUTES },
];
Create Order Page
- Create
order.component.tsfile under theprojects/ordering-service/src/lib/orderfolder as following code:
import { Component } from '@angular/core';
import { CommonModule } from '@angular/common';
import { OrderDto, OrderService } from './proxy/ordering-service/services';

@Component({
  selector: 'lib-order',
  templateUrl: './order.component.html',
  styleUrl: './order.component.css'
  imports: [CommonModule]
})
export class OrderComponent {

  items: OrderDto[] = [];

  constructor(private readonly proxy: OrderService) {
    this.proxy.getList().subscribe((res) => {
      this.items = res;
    });
  }

}
- Create
order.component.htmlfile under theprojects/ordering-service/src/lib/orderfolder as following code:
<div class="card">
    <div class="card-body">
        <table class="table table-bordered">
            <thead>
                <tr>
                    <th>Order ID</th>
                    <th>Product Id</th>
                    <th>Customer Name</th>
                </tr>
                <tr *ngFor="let item of items">
                    <td>{%{{{item.id}}}%}</td>
                    <td>{%{{{item.productId}}}%}</td>
                    <td>{%{{{item.customerName}}}%}</td>
                </tr>
            </thead>
        </table>
    </div>
</div>
{{end}}
Building and Running the Application
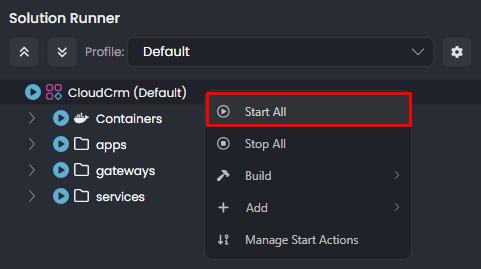
Now, we can run the application to see the changes. Please stop the applications if they are running. Then open the Solution Runner panel, right-click the CloudCrm root item, and select the Start command:
After the applications are started, you can Browse and navigate to the Orders page to see the list of orders:

Great! We have successfully implemented the Ordering module. However, there is a problem:
- We see Product's GUID ID instead of its name. This is because the Ordering microservice has no integration with the Catalog microservice and doesn't have access to Product microservice's database to perform a JOIN query.
We will solve this problem in the next part by implementing an integration service between the Ordering and Catalog microservices.
Summary
In this part, we implemented the Ordering module manually. We created the Order entity, the OrderState enum, the OrderAppService application service, and the user interface for the Orders page. We also added a menu item to the sidebar to navigate to the Orders page.