---
title: Asset Manager
---
# Asset Manager
In this section, you will see how to setup and take the full advantage of built-in Asset Manager in GrapesJS. The Asset Manager is lightweight and implements just an `image` in its core, but as you'll see next it's easy to extend and create your own asset types.
[[toc]]
## Configuration
To change default configurations you'd need to pass the `assetManager` property with the main configuration object
```js
const editor = grapesjs.init({
...
assetManager: {
assets: [...],
...
}
});
```
You can update most of them later by using `getConfig` inside of the module
```js
const amConfig = editor.AssetManager.getConfig();
```
Check the full list of available options here: [Asset Manager Config](https://github.com/GrapesJS/grapesjs/blob/master/src/asset_manager/config/config.ts)
## Initialization
The Asset Manager is ready to work by default, so pass few URLs to see them loaded
```js
const editor = grapesjs.init({
...
assetManager: {
assets: [
'http://placehold.it/350x250/78c5d6/fff/image1.jpg',
// Pass an object with your properties
{
type: 'image',
src: 'http://placehold.it/350x250/459ba8/fff/image2.jpg',
height: 350,
width: 250,
name: 'displayName'
},
{
// As the 'image' is the base type of assets, omitting it will
// be set as `image` by default
src: 'http://placehold.it/350x250/79c267/fff/image3.jpg',
height: 350,
width: 250,
name: 'displayName'
},
],
}
});
```
If you want a complete list of available properties check out the source [AssetImage Model](https://github.com/GrapesJS/grapesjs/blob/dev/packages/core/src/asset_manager/model/AssetImage.ts)
The built-in Asset Manager modal is implemented and is showing up when requested. By default, you can make it appear by dragging Image Components in canvas, double clicking on images and all other stuff related to images (eg. CSS styling)
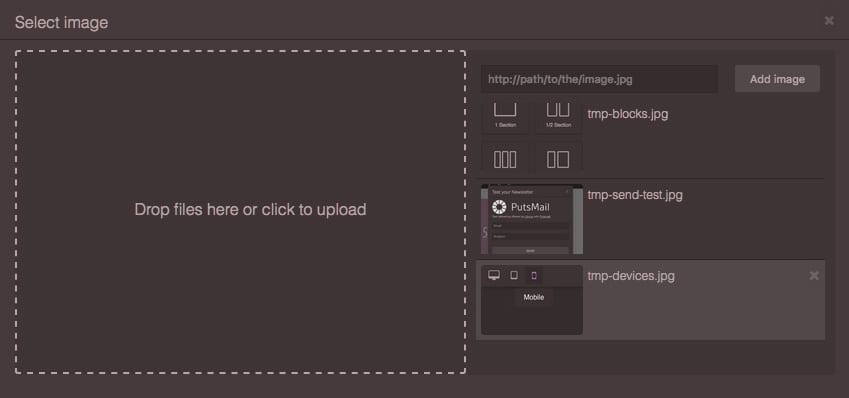
![]() ## Uploading assets
The default Asset Manager includes also an easy to use, drag-and-drop uploader with a few UI helpers. The default uploader is already visible when you open the Asset Manager.
## Uploading assets
The default Asset Manager includes also an easy to use, drag-and-drop uploader with a few UI helpers. The default uploader is already visible when you open the Asset Manager.
![]() You can click on the uploader to select your files or just drag them directly from your computer to trigger the uploader. Obviously, before it will work you have to setup your server to receive your assets and specify the upload endpoint in your configuration
```js
const editor = grapesjs.init({
...
assetManager: {
...
// Upload endpoint, set `false` to disable upload, default `false`
upload: 'https://endpoint/upload/assets',
// The name used in POST to pass uploaded files, default: `'files'`
uploadName: 'files',
...
},
...
});
```
### Listeners
If you want to execute an action before/after the uploading process (eg. loading animation) or even on response, you can make use of these listeners
```js
// The upload is started
editor.on('asset:upload:start', () => {
startAnimation();
});
// The upload is ended (completed or not)
editor.on('asset:upload:end', () => {
endAnimation();
});
// Error handling
editor.on('asset:upload:error', (err) => {
notifyError(err);
});
// Do something on response
editor.on('asset:upload:response', (response) => {
...
});
```
### Response
When the uploading is over, by default (via config parameter `autoAdd: 1`), the editor expects to receive a JSON of uploaded assets in a `data` key as a response and tries to add them to the main collection. The JSON might look like this:
```js
{
data: [
'https://.../image.png',
// ...
{
src: 'https://.../image2.png',
type: 'image',
height: 100,
width: 200,
},
// ...
];
}
```
## Programmatic usage
If you need to manage your assets programmatically you have to use its [APIs][API-Asset-Manager]
```js
// Get the Asset Manager module first
const am = editor.AssetManager;
```
First of all, it's worth noting that Asset Manager keeps 2 collections of assets:
- **global** - which is just the one with all available assets, you can get it with `am.getAll()`
- **visible** - this is the collection which is currently rendered by the Asset Manager, you get it with `am.getAllVisible()`
This allows you to decide which assets to show and when. Let's say we'd like to have a category switcher, first of all you gonna add to the **global** collection all your assets (which you may already defined at init by `config.assetManager.assets = [...]`)
```js
am.add([
{
// You can pass any custom property you want
category: 'c1',
src: 'http://placehold.it/350x250/78c5d6/fff/image1.jpg',
},
{
category: 'c1',
src: 'http://placehold.it/350x250/459ba8/fff/image2.jpg',
},
{
category: 'c2',
src: 'http://placehold.it/350x250/79c267/fff/image3.jpg',
},
// ...
]);
```
Now if you call the `render()`, without an argument, you will see all the assets rendered
```js
// without any argument
am.render();
am.getAll().length; // <- 3
am.getAllVisible().length; // <- 3
```
Ok, now let's show only assets from the first category
```js
const assets = am.getAll();
am.render(assets.filter((asset) => asset.get('category') == 'c1'));
am.getAll().length; // Still have 3 assets
am.getAllVisible().length; // but only 2 are shown
```
You can also mix arrays of assets
```js
am.render([...assets1, ...assets2, ...assets3]);
```
In case you want to update or remove an asset, you can make use of this methods
```js
// Get the asset via its `src`
const asset = am.get('http://.../img.jpg');
// Update asset property
asset.set({ src: 'http://.../new-img.jpg' });
// Remove asset
am.remove(asset); // or via src, am.remove('http://.../new-img.jpg');
```
For more APIs methods check out the [API Reference][API-Asset-Manager].
### Custom select logic
::: warning
This section is referring to GrapesJS v0.17.26 or higher
:::
You can open the Asset Manager with your own select logic.
```js
am.open({
types: ['image'], // This is the default option
// Without select, nothing will happen on asset selection
select(asset, complete) {
const selected = editor.getSelected();
if (selected && selected.is('image')) {
selected.addAttributes({ src: asset.getSrc() });
// The default AssetManager UI will trigger `select(asset, false)`
// on asset click and `select(asset, true)` on double-click
complete && am.close();
}
},
});
```
## Customization
The default Asset Manager UI is great for simple things, but except the possibility to tweak some CSS style, adding more complex things like a search input, filters, etc. requires a replace of the default UI.
All you have to do is to indicate the editor your intent to use a custom UI and then subscribe to the `asset:custom` event that will give you all the information on any requested change.
```js
const editor = grapesjs.init({
// ...
assetManager: {
// ...
custom: true,
},
});
editor.on('asset:custom', (props) => {
// The `props` will contain all the information you need in order to update your UI.
// props.open (boolean) - Indicates if the Asset Manager is open
// props.assets (Array) - Array of all assets
// props.types (Array) - Array of asset types requested, eg. ['image'],
// props.close (Function) - A callback to close the Asset Manager
// props.remove (Function) - A callback to remove an asset
// props.select (Function) - A callback to select an asset
// props.container (HTMLElement) - The element where you should append your UI
// Here you would put the logic to render/update your UI.
});
```
Here an example of using custom Asset Manager with a Vue component.
The example above is the right way if you need to replace the default UI, but as you might notice we append the mounted element to the container `props.container.appendChild(this.$el);`.
This is required as the Asset Manager, by default, is placed in the [Modal](/modules/Modal.html).
How to approach the case when your Asset Manager is a completely independent/external module (eg. should be shown in its own custom modal)? Not a problem, you can bind the Asset Manager state via `assetManager.custom.open`.
```js
const editor = grapesjs.init({
// ...
assetManager: {
// ...
custom: {
open(props) {
// `props` are the same used in `asset:custom` event
// ...
// Init and open your external Asset Manager
// ...
// IMPORTANT:
// When the external library is closed you have to communicate
// this state back to the editor, otherwise GrapesJS will think
// the Asset Manager is still open.
// example: myAssetManager.on('close', () => props.close())
},
close(props) {
// Close the external Asset Manager
},
},
},
});
```
It's important to declare also the `close` function, the editor should be able to close the Asset Manager via `am.close()`.
## Events
For a complete list of available events, you can check it [here](/api/assets.html#available-events).
[API-Asset-Manager]: /api/assets.html
You can click on the uploader to select your files or just drag them directly from your computer to trigger the uploader. Obviously, before it will work you have to setup your server to receive your assets and specify the upload endpoint in your configuration
```js
const editor = grapesjs.init({
...
assetManager: {
...
// Upload endpoint, set `false` to disable upload, default `false`
upload: 'https://endpoint/upload/assets',
// The name used in POST to pass uploaded files, default: `'files'`
uploadName: 'files',
...
},
...
});
```
### Listeners
If you want to execute an action before/after the uploading process (eg. loading animation) or even on response, you can make use of these listeners
```js
// The upload is started
editor.on('asset:upload:start', () => {
startAnimation();
});
// The upload is ended (completed or not)
editor.on('asset:upload:end', () => {
endAnimation();
});
// Error handling
editor.on('asset:upload:error', (err) => {
notifyError(err);
});
// Do something on response
editor.on('asset:upload:response', (response) => {
...
});
```
### Response
When the uploading is over, by default (via config parameter `autoAdd: 1`), the editor expects to receive a JSON of uploaded assets in a `data` key as a response and tries to add them to the main collection. The JSON might look like this:
```js
{
data: [
'https://.../image.png',
// ...
{
src: 'https://.../image2.png',
type: 'image',
height: 100,
width: 200,
},
// ...
];
}
```
## Programmatic usage
If you need to manage your assets programmatically you have to use its [APIs][API-Asset-Manager]
```js
// Get the Asset Manager module first
const am = editor.AssetManager;
```
First of all, it's worth noting that Asset Manager keeps 2 collections of assets:
- **global** - which is just the one with all available assets, you can get it with `am.getAll()`
- **visible** - this is the collection which is currently rendered by the Asset Manager, you get it with `am.getAllVisible()`
This allows you to decide which assets to show and when. Let's say we'd like to have a category switcher, first of all you gonna add to the **global** collection all your assets (which you may already defined at init by `config.assetManager.assets = [...]`)
```js
am.add([
{
// You can pass any custom property you want
category: 'c1',
src: 'http://placehold.it/350x250/78c5d6/fff/image1.jpg',
},
{
category: 'c1',
src: 'http://placehold.it/350x250/459ba8/fff/image2.jpg',
},
{
category: 'c2',
src: 'http://placehold.it/350x250/79c267/fff/image3.jpg',
},
// ...
]);
```
Now if you call the `render()`, without an argument, you will see all the assets rendered
```js
// without any argument
am.render();
am.getAll().length; // <- 3
am.getAllVisible().length; // <- 3
```
Ok, now let's show only assets from the first category
```js
const assets = am.getAll();
am.render(assets.filter((asset) => asset.get('category') == 'c1'));
am.getAll().length; // Still have 3 assets
am.getAllVisible().length; // but only 2 are shown
```
You can also mix arrays of assets
```js
am.render([...assets1, ...assets2, ...assets3]);
```
In case you want to update or remove an asset, you can make use of this methods
```js
// Get the asset via its `src`
const asset = am.get('http://.../img.jpg');
// Update asset property
asset.set({ src: 'http://.../new-img.jpg' });
// Remove asset
am.remove(asset); // or via src, am.remove('http://.../new-img.jpg');
```
For more APIs methods check out the [API Reference][API-Asset-Manager].
### Custom select logic
::: warning
This section is referring to GrapesJS v0.17.26 or higher
:::
You can open the Asset Manager with your own select logic.
```js
am.open({
types: ['image'], // This is the default option
// Without select, nothing will happen on asset selection
select(asset, complete) {
const selected = editor.getSelected();
if (selected && selected.is('image')) {
selected.addAttributes({ src: asset.getSrc() });
// The default AssetManager UI will trigger `select(asset, false)`
// on asset click and `select(asset, true)` on double-click
complete && am.close();
}
},
});
```
## Customization
The default Asset Manager UI is great for simple things, but except the possibility to tweak some CSS style, adding more complex things like a search input, filters, etc. requires a replace of the default UI.
All you have to do is to indicate the editor your intent to use a custom UI and then subscribe to the `asset:custom` event that will give you all the information on any requested change.
```js
const editor = grapesjs.init({
// ...
assetManager: {
// ...
custom: true,
},
});
editor.on('asset:custom', (props) => {
// The `props` will contain all the information you need in order to update your UI.
// props.open (boolean) - Indicates if the Asset Manager is open
// props.assets (Array) - Array of all assets
// props.types (Array) - Array of asset types requested, eg. ['image'],
// props.close (Function) - A callback to close the Asset Manager
// props.remove (Function) - A callback to remove an asset
// props.select (Function) - A callback to select an asset
// props.container (HTMLElement) - The element where you should append your UI
// Here you would put the logic to render/update your UI.
});
```
Here an example of using custom Asset Manager with a Vue component.
The example above is the right way if you need to replace the default UI, but as you might notice we append the mounted element to the container `props.container.appendChild(this.$el);`.
This is required as the Asset Manager, by default, is placed in the [Modal](/modules/Modal.html).
How to approach the case when your Asset Manager is a completely independent/external module (eg. should be shown in its own custom modal)? Not a problem, you can bind the Asset Manager state via `assetManager.custom.open`.
```js
const editor = grapesjs.init({
// ...
assetManager: {
// ...
custom: {
open(props) {
// `props` are the same used in `asset:custom` event
// ...
// Init and open your external Asset Manager
// ...
// IMPORTANT:
// When the external library is closed you have to communicate
// this state back to the editor, otherwise GrapesJS will think
// the Asset Manager is still open.
// example: myAssetManager.on('close', () => props.close())
},
close(props) {
// Close the external Asset Manager
},
},
},
});
```
It's important to declare also the `close` function, the editor should be able to close the Asset Manager via `am.close()`.
## Events
For a complete list of available events, you can check it [here](/api/assets.html#available-events).
[API-Asset-Manager]: /api/assets.html