14 KiB
| title |
|---|
| Asset Manager |
Asset Manager
In this section, you will see how to setup and take the full advantage of built-in Asset Manager in GrapesJS. The Asset Manager is lightweight and implements just an image in its core, but as you'll see next it's easy to extend and create your own asset types.
Configuration
To change default configurations you'd need to pass the assetManager property with the main configuration object
const editor = grapesjs.init({
  ...
  assetManager: {
    assets: [...],
    ...
  }
});
You can update most of them later by using getConfig inside of the module
const amConfig = editor.AssetManager.getConfig();
Check the full list of available options here: Asset Manager Config
Initialization
The Asset Manager is ready to work by default, so pass few URLs to see them loaded
const editor = grapesjs.init({
  ...
  assetManager: {
    assets: [
     'http://placehold.it/350x250/78c5d6/fff/image1.jpg',
     // Pass an object with your properties
     {
       type: 'image',
       src: 'http://placehold.it/350x250/459ba8/fff/image2.jpg',
       height: 350,
       width: 250,
       name: 'displayName'
     },
     {
       // As the 'image' is the base type of assets, omitting it will
       // be set as `image` by default
       src: 'http://placehold.it/350x250/79c267/fff/image3.jpg',
       height: 350,
       width: 250,
       name: 'displayName'
     },
    ],
  }
});
If you want a complete list of available properties check out the source AssetImage Model
The built-in Asset Manager modal is implemented and is showing up when requested. By default, you can make it appear by dragging Image Components in canvas, double clicking on images and all other stuff related to images (eg. CSS styling)
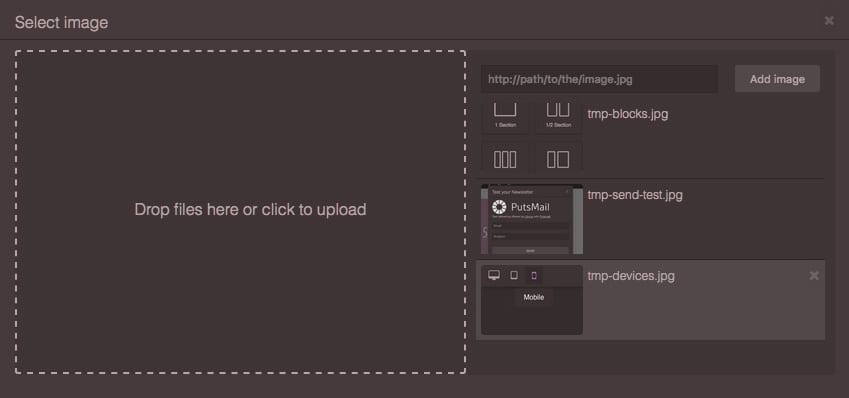
Uploading assets
The default Asset Manager includes also an easy to use, drag-and-drop uploader with a few UI helpers. The default uploader is already visible when you open the Asset Manager.
You can click on the uploader to select your files or just drag them directly from your computer to trigger the uploader. Obviously, before it will work you have to setup your server to receive your assets and specify the upload endpoint in your configuration
const editor = grapesjs.init({
  ...
  assetManager: {
    ...
    // Upload endpoint, set `false` to disable upload, default `false`
    upload: 'https://endpoint/upload/assets',

    // The name used in POST to pass uploaded files, default: `'files'`
    uploadName: 'files',
    ...
  },
  ...
});
Listeners
If you want to execute an action before/after the uploading process (eg. loading animation) or even on response, you can make use of these listeners
// The upload is started
editor.on('asset:upload:start', () => {
  startAnimation();
});

// The upload is ended (completed or not)
editor.on('asset:upload:end', () => {
  endAnimation();
});

// Error handling
editor.on('asset:upload:error', (err) => {
  notifyError(err);
});

// Do something on response
editor.on('asset:upload:response', (response) => {
  ...
});
Response
When the uploading is over, by default (via config parameter autoAdd: 1), the editor expects to receive a JSON of uploaded assets in a data key as a response and tries to add them to the main collection. The JSON might look like this:
{
  data: [
    'https://.../image.png',
    // ...
    {
      src: 'https://.../image2.png',
      type: 'image',
      height: 100,
      width: 200,
    },
    // ...
  ]
}
Programmatic usage
If you need to manage your assets programmatically you have to use its APIs
// Get the Asset Manager module first
const am = editor.AssetManager;
First of all, it's worth nothing that Asset Manager keeps 2 collections of assets:
- global - which is just the one with all available assets, you can get it with
am.getAll() - visible - this is the collection which is currently rendered by the Asset Manager, you get it with
am.getAllVisible()
This allows you to decide which assets to show and when. Let's say we'd like to have a category switcher, first of all you gonna add to the global collection all your assets (which you may already defined at init by config.assetManager.assets = [...])
am.add([
  {
    // You can pass any custom property you want
    category: 'c1',
    src: 'http://placehold.it/350x250/78c5d6/fff/image1.jpg',
  }, {
    category: 'c1',
    src: 'http://placehold.it/350x250/459ba8/fff/image2.jpg',
  }, {
    category: 'c2',
    src: 'http://placehold.it/350x250/79c267/fff/image3.jpg',
  }
  // ...
]);
Now if you call the render(), without an argument, you will see all the assets rendered
// without any argument
am.render();

am.getAll().length // <- 3
am.getAllVisible().length // <- 3
Ok, now let's show only assets form the first category
const assets = am.getAll();

am.render(assets.filter(
  asset => asset.get('category') == 'c1'
));

am.getAll().length // Still have 3 assets
am.getAllVisible().length // but only 2 are shown
You can also mix arrays of assets
am.render([...assets1, ...assets2, ...assets3]);
In case you want to update or remove an asset, you can make use of this methods
// Get the asset via its `src`
const asset = am.get('http://.../img.jpg');

// Update asset property
asset.set({ src: 'http://.../new-img.jpg' });

// Remove asset
am.remove(asset); // or via src, am.remove('http://.../new-img.jpg');
For more APIs methods check out the API Reference
Custom select logic
::: warning This section is referring to GrapesJS v0.17.26 or higher :::
You can open the Asset Manager with your own select logic.
am.open({
 types: ['image'], // This is the default option
 // Without select, nothing will happen on asset selection
 select(asset, complete) {
   const selected = editor.getSelected();

   if (selected && selected.is('image')) {
     selected.addAttributes({ src: asset.getSrc() });
     // The default AssetManager UI will trigger `select(asset, false)`
     // on asset click and `select(asset, true)` on double-click
     complete && am.close();
   }
 }
});
Customization
Define new Asset type
Generally speaking, images aren't the only asset you'll use, it could be a video, svg-icon, or any other kind of document. Each type of asset is applied in our templates/pages differently. If you need to change the image of the Component all you need is another url in src attribute. However In case of a svg-icon, its not the same, you might want to replace the element with a new <svg> content. Besides this you also have to deal with the presentation/preview of the asset inside the panel/modal. For example, showing a thumbnail for big images or the possibility to preview videos.
Defining a new asset it means we have to push on top of the 'Stack of Types' a new layer. This stack is iterated over by the editor at any addition of the asset and tries to associate the correct type.
am.add('https://.../image.png');
// string, url, ends with '.png' -> it's an 'image' type

am.add('<svg ...');
// string and starts with '<svg...' -> 'svg' type

am.add({type: 'video', src: '...'});
// an object, has 'video' type key -> 'video' type
It's up to you tell the editor how to recognize your type and for this purpose you should to use isType() method.
Let's see now an example of how we'd start to defining a type like svg-icon
am.addType('svg-icon', {
  // `value` is for example the argument passed in `am.add(VALUE);`
  isType(value) {
    // The condition is intentionally simple
    if (value.substring(0, 5) == '<svg ') {
      return {
        type: 'svg-icon',
        svgContent: value
      };
    }
    // Maybe you pass the `svg-icon` object already
    else if (typeof value == 'object' && value.type == 'svg-icon') {
      return value;
    }
  }
})
With this snippet you can already add SVGs, the asset manager will assign the appropriate type.
// Add some random SVG
am.add(`<svg viewBox="0 0 24 24" xmlns="http://www.w3.org/2000/svg">
  <path d="M22,9 C22,8.4 21.5,8 20.75,8 L3.25,8 C2.5,8 2,8.4 2,9 L2,15 C2,15.6 2.5,16 3.25,16 L20.75,16 C21.5,16 22,15.6 22,15 L22,9 Z M21,15 L3,15 L3,9 L21,9 L21,15 Z"></path>
  <polygon points="4 10 5 10 5 14 4 14"></polygon>
</svg>`);
The default open-assets command shows only image assets, so to render svg-icon run this
am.render(am.getAll().filter(
  asset => asset.get('type') == 'svg-icon'
));
You should see something like this
The SVG asset is not rendered correctly and this is because we haven't yet configured its view
am.addType('svg-icon', {
  view: {
    // `getPreview()` and `getInfo()` are just few helpers, you can
    // override the entire template with `template()`
    // Check the base `template()` here:
    // https://github.com/artf/grapesjs/blob/dev/src/asset_manager/view/AssetView.js
    getPreview() {
      return `<div style="text-align: center">${this.model.get('svgContent')}</div>`;
    },
    getInfo() {
      // You can use model's properties if you passed them:
      // am.add({
      //  type: 'svg-icon',
      //  svgContent: '<svg ...',
      //  name: 'Some name'
      //  })
      //  ... then
      //  this.model.get('name');
      return '<div>SVG description</div>';
    },
  },
  isType(value) {...}
})
This is the result
Now we have to deal with how to assign our svgContent to the selected element
am.addType('svg-icon', {
  view: {
    // In our case the target is the selected component
    updateTarget(target) {
      const svg = this.model.get('svgContent');

      // Just to make things bit interesting, if it's an image type
      // I put the svg as a data uri, content otherwise
      if (target.get('type') == 'image') {
        // Tip: you can also use `data:image/svg+xml;utf8,<svg ...` but you
        // have to escape few chars
        target.set('src', `data:mime/type;base64,${btoa(svg)}`);
      } else {
        target.set('content', svg);
      }
    },
    ...
  },
  isType(value) {...}
})
Our custom svg-icon asset is ready to use. You can also add a model to the addType definition to group the business logic of your asset, but usually it's optional.
// Just an example of model use
am.addType('svg-icon', {
  model: {
    // With `default` you define model's default properties
    defaults: {
      type:  'svg-icon',
      svgContent: '',
      name: 'Default SVG Name',
    },

    // You can call model's methods inside views:
    // const name = this.model.getName();
    getName() {
      return this.get('name');
    }
  },
  view: {...},
  isType(value) {...}
})
Extend Asset Types
Extending asset types is basically the same as adding them, you can choose what type to extend and how.
// svgIconType will contain the definition (model, view, isType)
const svgIconType = am.getType('svg-icon');

// Add new type and extend another one
am.addType('svg-icon2', {
  view: svgIconType.view.extend({
    getInfo() {
      return '<div>SVG2 description</div>';
    },
  }),
  // The `isType` is important, but if you omit it the default one will be added
  // isType(value) {
  //  if (value && value.type == id) {
  //    return {type: value.type};
  //  }
  // };
})
You can also extend the already defined types (to be sure to load assets with the old type extended create a plugin for your definitions)
// Extend the original `image` and add a confirm dialog before removing it
am.addType('image', {
  // As you adding on top of an already defined type you can avoid indicating
  // `am.getType('image').view.extend({...` the editor will do it by default
  // but you can eventually extend some other type
  view: {
    // If you want to see more methods to extend check out
    // https://github.com/artf/grapesjs/blob/dev/src/asset_manager/view/AssetImageView.js
    onRemove(e) {
      e.stopPropagation();
      const model = this.model;

      if (confirm('Are you sure?')) {
        model.collection.remove(model);
      }
    }
  },
})
Events
For a complete list of available events, you can check it here.