
24 KiB
//[doc-seo]
{
    "Description": "Add ABP Low-Code to an existing EF Core solution. Import the backend module from ABP Studio, then manually add the _Dynamic initializer, host/migrator wiring, and React runtime integration."
}
Add Low-Code to an Existing Solution
Preview: The Low-Code System is currently in preview. APIs, generated files, designer behavior, and React runtime details may change before general availability.
This guide explains how to add the ABP Low-Code System to an existing solution instead of generating a new solution with Low-Code enabled from the beginning.
Keep every ABP and Low-Code package aligned with the ABP version used by the existing solution. When an example contains a version placeholder, replace it with that version instead of copying a version from another solution.
Supported Scenarios
This guide is for existing solutions that meet these conditions:
- Database provider: EF Core relational provider
- Architecture: Layered, modular monolith, or no-layers
- Frontend: React is supported, but its runtime integration is currently manual
This guide does not cover:
- MongoDB solutions
- Microservice solutions
What ABP Studio Import Adds
When you import Volo.Abp.LowCode from ABP Studio, Studio can add the backend package references and the related ABP module dependencies for you.
Depending on the solution structure, the import step can add or update:
Volo.Abp.LowCode.*package references in the backend projects[DependsOn]entries in the ABP module classes- EF Core runtime calls such as
builder.ConfigureLowCode()andbuilder.ConfigureDynamicEntities() - an
Added_DynamicEntities_LowCodemigration in templates where Studio can run the EF Core migration flow
The import step did not create everything needed for a fully working Low-Code solution. You still need to add:
- The
_Dynamicsource-controlled model folder - The Low-Code initializer class
- Host startup wiring for model initialization and
--check-lowcode-model-files - Design-time EF Core wiring in the DbContext factory
- The default
DynamicEntityrepository and Low-Code custom endpoint mapping - Verification of Studio's DbContext call order and generated migration
- React runtime package and route/menu integration
Step 1: Import the Backend Module in ABP Studio
Open your solution in ABP Studio.
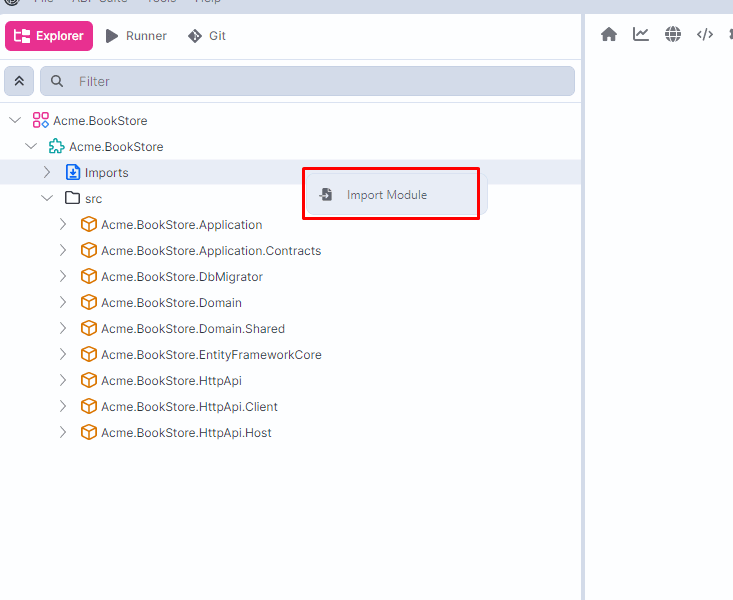
Right-click the module root or use the Imports node and select Import Module:
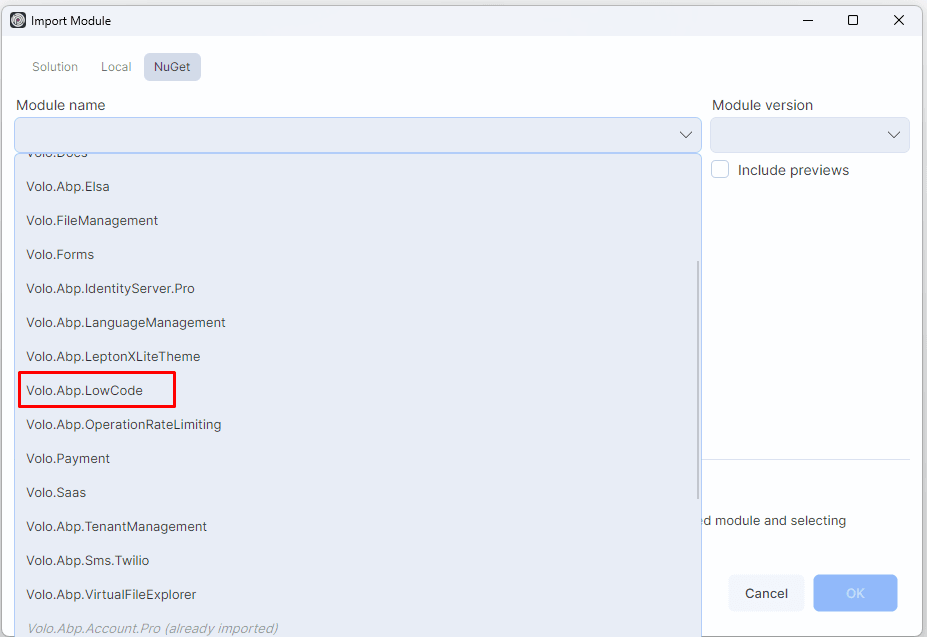
In the NuGet tab, select Volo.Abp.LowCode:
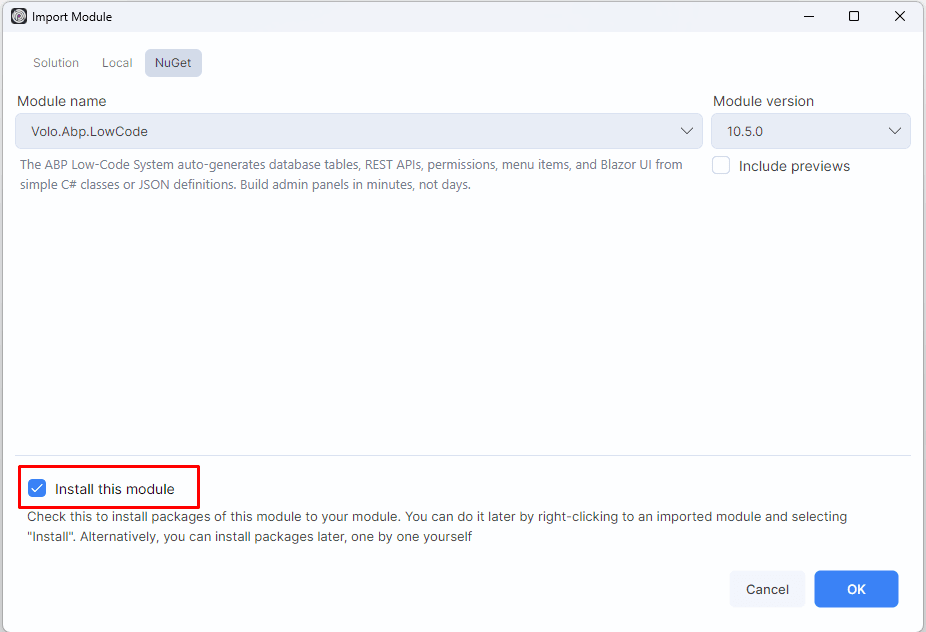
Keep Install this module checked and continue:
Studio then opens the Packages dialog.
For a layered solution, Studio already suggests the correct packages for the correct layers. You can accept the suggested selection and continue.
For no-layers and similar compatible templates, the flow is the same: accept the suggested package selection and continue.
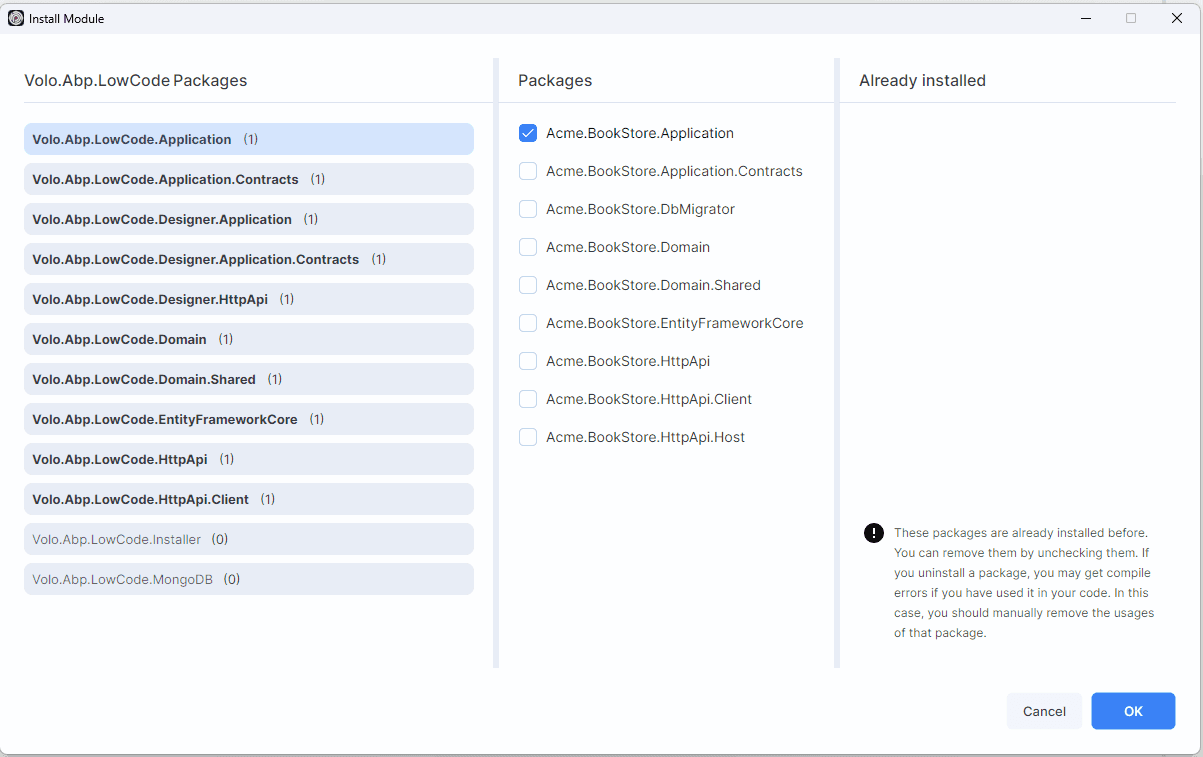
Studio can also create a migration and insert the two Low-Code model configuration calls. Inspect both results instead of adding a second migration immediately. In particular, verify that ConfigureDynamicEntities() appears before base.OnModelCreating(builder) as shown in Step 5; move it when Studio inserts both calls after the base call.
Step 2: Create the _Dynamic Folder
After the import step, create the source-controlled _Dynamic folder manually.
Use these locations:
| Solution type | _Dynamic location |
|---|---|
| Layered / modular monolith | src/<YourProject>.Domain/_Dynamic/ |
| No-layers | <YourProject>/_Dynamic/ |
If your solution contains multiple modules, put _Dynamic under the domain project of the module that should own the low-code entities and pages.
Create this folder structure:
_Dynamic/
  model/
    backgroundJobs/
    backgroundWorkers/
    endpoints/
    entities/
    enums/
    eventHandlers/
    forms/
    pageGroups/
    pages/
    permissions/
  model-examples/
You can keep these folders empty at first. If you want starter descriptors, create a temporary Low-Code enabled solution with the same template and copy its model-examples/ contents.
Git does not track empty directories. Add a .gitkeep file to each empty directory or commit an initial descriptor so a fresh checkout contains the required structure.
Step 3: Add the Low-Code Initializer
Create a <ProjectName>LowCodeInitializer.cs file inside _Dynamic/.
For a layered solution, the file typically lives at:
src/<YourProject>.Domain/_Dynamic/<YourProject>LowCodeInitializer.cs
Example:
using System;
using System.IO;
using System.Threading.Tasks;
using Volo.Abp.Identity;
using Volo.Abp.LowCode.Configuration;
using Volo.Abp.LowCode.Modeling;
using Volo.Abp.Threading;

namespace <RootNamespace>._Dynamic;

public static class <ProjectName>LowCodeInitializer
{
    private static readonly AsyncOneTimeRunner ConfigurationRunner = new();
    private static readonly AsyncOneTimeRunner InitializationRunner = new();

    public static async Task InitializeAsync()
    {
        await ConfigureAsync();
        await InitializationRunner.RunAsync(DynamicModelManager.Instance.InitializeAsync);
    }

    public static async Task ConfigureAsync()
    {
        await ConfigurationRunner.RunAsync(() =>
        {
            AbpDynamicEntityConfig.ReferencedEntityList.Add<IdentityUser>(
                nameof(IdentityUser.UserName),
                nameof(IdentityUser.Email)
            )
                .WithShortcut("user")
                .AsUserReference()
                .WithViewPermission("AbpIdentity.Users");

            AbpDynamicEntityConfig.SourceAssemblies.Add(
                new DynamicEntityAssemblyInfo(
                    typeof(<AssemblyMarkerModule>).Assembly,
                    rootNamespace: "<RootNamespace>",
                    projectRootPath: ResolveSourcePath()
                )
            );

            return Task.CompletedTask;
        });
    }

    private static string? ResolveSourcePath()
    {
        var baseDir = AppContext.BaseDirectory;
        var current = new DirectoryInfo(baseDir);

        for (int i = 0; i < 10 && current != null; i++)
        {
            var candidate = Path.Combine(current.FullName, "<ProjectRootRelativePath>");
            if (Directory.Exists(Path.Combine(candidate, "_Dynamic")))
            {
                return candidate;
            }

            current = current.Parent;
        }

        return null;
    }
}
Replace these placeholders:
<ProjectName>:BookStore<RootNamespace>:Acme.BookStore<AssemblyMarkerModule>:- layered:
<YourProject>DomainModule - no-layers:
<YourProject>Module
- layered:
<ProjectRootRelativePath>:- layered:
src/<YourProject>.Domain - no-layers:
<YourProject>
- layered:
The IdentityUser registration is the same pattern used by the generated templates. It gives you a ready-to-use user reference in the designer.
Step 4: Include _Dynamic Files in the Project
Add _Dynamic as content and embed its JSON descriptors.
For a layered solution, add this to src/<YourProject>.Domain/<YourProject>.Domain.csproj:
<ItemGroup>
  <Content Include="_Dynamic\**\*">
    <CopyToOutputDirectory>PreserveNewest</CopyToOutputDirectory>
    <CopyToPublishDirectory>PreserveNewest</CopyToPublishDirectory>
  </Content>
  <EmbeddedResource Include="_Dynamic\model\**\*.json">
    <LogicalName>$(RootNamespace).$([System.String]::Copy('%(Identity)').Replace('\', '.').Replace('/', '.'))</LogicalName>
  </EmbeddedResource>
</ItemGroup>
For a no-layers solution, add the same block to the main host project file instead.
Step 5: Wire the Backend Startup
Host Program
Update the main runnable backend host Program.cs:
-
layered React or Angular template:
src/<YourProject>.HttpApi.Host/Program.cs -
layered MVC, Razor Pages, Blazor Server, or Blazor Web App template: the runnable
src/<YourProject>.Web/Program.csor equivalent web host -
no-layers:
<YourProject>/Program.cs -
add
using <RootNamespace>._Dynamic; -
add
using Volo.Abp.LowCode.Modeling; -
handle
--check-lowcode-model-files -
call
await <ProjectName>LowCodeInitializer.InitializeAsync();before the normal startup
Add this pattern before your normal startup code:
if (LowCodeModelFileCheckCommandLineRunner.IsCommand(args))
{
    await <ProjectName>LowCodeInitializer.ConfigureAsync();
    return await LowCodeModelFileCheckCommandLineRunner.RunAsync(
        args,
        Log.Information,
        Log.Warning,
        Log.Error);
}

await <ProjectName>LowCodeInitializer.InitializeAsync();
DbMigrator
For a layered solution, update src/<YourProject>.DbMigrator/Program.cs and call the initializer before RunConsoleAsync():
await <ProjectName>LowCodeInitializer.InitializeAsync();
await CreateHostBuilder(args).RunConsoleAsync();
For a no-layers solution, the main host typically handles migration mode itself by using --migrate-database. In that case, keep the initializer in the main host startup path.
DbContext Model Configuration Order
The order of the Low-Code model configuration calls is significant. Implement IDbContextWithDynamicEntities and keep this exact order in the application's EF Core DbContext:
public class <ProjectName>DbContext
    : AbpDbContext<<ProjectName>DbContext>,
      IDbContextWithDynamicEntities
{
    protected override void OnModelCreating(ModelBuilder builder)
    {
        builder.ConfigureDynamicEntities();

        base.OnModelCreating(builder);

        builder.ConfigureLowCode();
    }
}
ConfigureDynamicEntities() must run before base.OnModelCreating(builder) so the dynamic entity mappings are available when ABP applies its base model conventions. Keep ConfigureLowCode() after the base call, as shown above. Reordering or omitting these calls can produce an incomplete migration model or a runtime EF Core model that differs from the design-time model.
Run the Low-Code initializer before creating the DbContext for design-time migration operations. The runtime host, DbMigrator, and design-time factory must all build the same Low-Code model before migrations are generated or applied.
Design-Time DbContext Factory
Update the EF Core DbContext factory:
- add
using <RootNamespace>._Dynamic; - add
using Volo.Abp.LowCode.EntityFrameworkCore; - add
using Volo.Abp.Threading;
Then call:
LowCodeEfCoreTypeBuilderExtensions.Configure();
AsyncHelper.RunSync(<ProjectName>LowCodeInitializer.InitializeAsync);
This is required for design-time EF Core operations such as migrations.
Dynamic Entity Repository
Add the default repository explicitly in the EF Core module. Studio package import does not guarantee that an existing AddAbpDbContext block is updated:
using Volo.Abp.LowCode.Entities;

context.Services.AddAbpDbContext<<ProjectName>DbContext>(options =>
{
    options.AddDefaultRepositories(includeAllEntities: true);
    options.AddDefaultRepository<DynamicEntity>();
});
Low-Code Custom Endpoints
Map generated custom endpoints inside the host's existing UseConfiguredEndpoints call:
using Volo.Abp.LowCode.Endpoints;

app.UseConfiguredEndpoints(endpoints =>
{
    endpoints.UseLowCodeCustomEndpoints();
});
Do not add a second UseConfiguredEndpoints block. Extend the existing block so conventional controllers, generated endpoints, and any later scoped SPA fallback share the same endpoint pipeline.
Verify the Migration
After all runtime and design-time wiring is complete, check whether Studio's migration still matches the final model:
dotnet ef migrations has-pending-model-changes `
  --project src\<YourProject>.EntityFrameworkCore `
  --startup-project src\<YourProject>.DbMigrator `
  --no-build
If the command reports no changes, keep the Studio-generated migration and do not add an empty or duplicate migration. If changes remain, inspect the existing migration first and then create one migration from the fully configured model.
Step 6: Add Admin Console for the Designer
Studio imports the Designer application and HTTP API packages, but an existing runnable host may not contain the Admin Console browser shell. Check the host project for Volo.Abp.AdminConsole and its module class for AbpAdminConsoleModule.
If they are absent, add Admin Console to the runnable host. This is the only CLI-based module installation in this guide; Low-Code itself must still be imported with Studio:
abp add-package Volo.Abp.AdminConsole `
  --project "src\<YourProject>.Web\<YourProject>.Web.csproj" `
  --version <AbpVersion>
Use .HttpApi.Host instead of .Web when that is the solution's runnable backend host. Confirm that the host module depends on AbpAdminConsoleModule.
Keep the existing application at / and enable Admin Console under /admin-console:
{
  "AdminConsole": {
    "IsEnabled": true,
    "RedirectRootToAdminConsole": false,
    "Authority": "https://localhost:<host-port>",
    "ClientId": "<YourProject>_AdminConsole",
    "Scope": "openid profile email offline_access <YourProject>"
  }
}
Add a dedicated Admin Console entry to the DbMigrator's OpenIddict:Applications configuration and seed it as a public web client. Do not reuse the MVC, Angular, React runtime, Blazor, or Swagger client.
{
  "<YourProject>_AdminConsole": {
    "ClientId": "<YourProject>_AdminConsole",
    "RootUrl": "https://localhost:<host-port>/admin-console"
  }
}
Seed authorization code, refresh token, LinkLogin, and Impersonation grants with these exact callback shapes:
https://localhost:<host-port>/admin-console/
https://localhost:<host-port>/admin-console/silent-renew.html
Use the trailing-slash Admin Console URL as the post-logout URI. Run DbMigrator again so the OIDC client and AbpLowCodeDesigner.* permission definitions are seeded.
Admin Console is a separate frontend with its own layout, assets, navigation, and OIDC lifecycle. By default, it can expose Admin Console interfaces from other installed modules in addition to Low-Code. Hiding an entry changes UI composition only; it does not uninstall that module, disable its API, or replace authorization. If the product requires a Designer-only Admin Console, implement an explicit fail-closed module discovery allowlist and account for the built-in home page's static management cards, which can still link to omitted routes that return 404.
Step 7: Add the React Runtime Manually
ABP Studio import currently does not retrofit the React runtime automatically. You need to add the React side manually.
Install the Packages
Use the package manager already used by your react/ folder. Replace <AbpVersion> with the version used by the existing ABP packages and <FontAwesomeVersion> with the compatible version declared by a Low-Code React template generated for that ABP version:
npm install "@volo/abp-react-lowcode@<AbpVersion>" "@fortawesome/fontawesome-free@<FontAwesomeVersion>"
The generated Low-Code React templates also include @fortawesome/fontawesome-free because dynamic page and page-group icons are stored as Font Awesome class names.
Import Font Awesome CSS
Add this to react/src/main.tsx:
import '@fortawesome/fontawesome-free/css/all.min.css'
Configure the Runtime
In react/src/App.tsx:
- import
configureLowCodeandLowCodeLocalizationProvider - pass your Axios instance, notifications, localization callback, and router navigation
- wrap the router with
LowCodeLocalizationProvider
Use the same pattern as the generated template:
configureLowCode({
  axios: api,
  onError: (err) => toast.error(err.message),
  onSuccess: (message) => toast.success(message),
  translate,
  navigate: (path) => router.navigate({ to: path }),
})
The Low-Code React source template contains the Axios antiforgery configuration below, but do not assume every distributed template artifact contains it. Inspect the generated application's shared Axios instance, keep the values when present, and add them when absent. Do not create a second client for Low-Code requests.
export const api = axios.create({
  // Existing base URL and headers...
  xsrfCookieName: 'XSRF-TOKEN',
  xsrfHeaderName: 'RequestVerificationToken',
})
Without these values, Low-Code reads can succeed while create, update, delete, and import requests fail with 400. Do not disable backend antiforgery validation as a workaround.
For a complete runtime example, see React Runtime.
Add Dynamic Routes
In react/src/routes/router.tsx, add:
import { createDynamicRoutes } from '@volo/abp-react-lowcode'
import { authGuard } from '@/lib/routing/guards'

const dynamicEntityRoute = createDynamicRoutes(rootRoute, {
  beforeLoad: authGuard,
})
Then add dynamicEntityRoute to the route tree.
Add Dynamic Menu Items
In your sidebar or main navigation component:
- import
useMenuItems - map
DynamicMenuItemDefinitionobjects into your menu structure - merge the dynamic menu items with your static route configuration
Typical pattern:
const { isAuthenticated } = useAuth()
const { data: dynamicMenuItems } = useMenuItems({
  enabled: isAuthenticated,
})

const dynamicRouteConfig = useMemo(
  () => (dynamicMenuItems ?? []).map(menuItemToRouteConfig),
  [dynamicMenuItems]
)

const visibleItems = useMemo(
  () => sortRouteItems([...visibleStaticItems, ...visibleDynamicItems]),
  [visibleStaticItems, visibleDynamicItems]
)
If you want to use the same icon behavior as the generated template, render the item.icon value as a Font Awesome class.
Do not request the Low-Code menu for an anonymous user. The backend filters the returned page tree by the current user's generated page permissions and removes empty groups. The route guard remains required because hiding a menu item is only a navigation concern; generated page and endpoint permissions are the authorization boundary.
Exclude the Package from Vite OptimizeDeps
In react/vite.config.ts, add:
optimizeDeps: {
  exclude: ['@volo/abp-react-lowcode'],
},
Step 8: Validate the Installation
Backend Validation
Run the solution build:
dotnet build
Validate the descriptor files:
dotnet run --project src/<YourProject>.HttpApi.Host -- --check-lowcode-model-files
For a layered MVC or Blazor application, use its runnable .Web project instead of .HttpApi.Host.
For no-layers:
dotnet run --project <YourProject> -- --check-lowcode-model-files
Database Validation
For layered solutions:
Push-Location src\<YourProject>.DbMigrator
dotnet run --no-build
Pop-Location
Run from the DbMigrator project directory when appsettings.secrets.json is stored there. AddAppSettingsSecretsJson() resolves its path relative to the process content root/current directory; running the same binary from the solution root can make a commercial module terminate with ABP-LIC-0020 even though the project-local file exists. Do not commit or print the license value.
For no-layers:
dotnet run --project <YourProject> -- --migrate-database
React Validation
Install dependencies with the package manager and lockfile already used by the application, then run its quality checks as well as the production build:
npm ci
npm run lint
npm run test:run
npm run build
If the application uses Yarn, use the equivalent locked install and existing scripts, for example yarn install --frozen-lockfile, yarn lint, yarn test:run, and yarn build. Do not silently replace the lockfile or switch package managers while adding Low-Code.
Testing Library packages have peer dependencies. If TypeScript or the test runner cannot resolve exports such as screen, waitFor, or fireEvent, inspect the generated package manifest before changing application code. Install a compatible @testing-library/dom version only when it is missing; do not add a duplicate version without checking the manifest and lockfile.
If you only want to test the runtime interactively, you can also run the React development server and open the host plus React app together.
Do not stop at a successful build. In a browser, verify all of the following:
- Anonymous users do not see or request dynamic menu items.
- A signed-in user with no visible generated page does not see
Dynamic. - Creating a page in Designer makes
Dynamicappear only for a user who can access that page. - The generated page definition and data requests return
200. - A create or update request includes
RequestVerificationTokenand succeeds. - Opening a dynamic deep link anonymously returns to the exact same
/lowcode/dynamic/<page-name>URL after login. /admin-console/lowcode-designeropens withAbpLowCodeDesigner.Default, and/still opens the existing application.- If a module discovery allowlist is used,
/admin-console/api/modulesenables only the intended module keys and direct omitted routes return404.
Step 9: Open the Designer
After the backend is running, open:
https://localhost:<host-port>/admin-console/lowcode-designer
If you already copied or created active page descriptors under _Dynamic/model/pages, open them at:
http://localhost:<react-port>/dynamic/<page-name>
Troubleshooting
| Symptom | Likely cause |
|---|---|
--check-lowcode-model-files works but no low-code pages appear |
_Dynamic exists, but you do not have any active descriptors under model/ yet |
Invalid object name ... |
The descriptors are active, but the database schema has not been migrated yet |
/admin-console/lowcode-designer returns 404 |
The runnable host does not contain Volo.Abp.AdminConsole/AbpAdminConsoleModule, or Studio did not install the Designer HTTP API packages into the host. |
/admin-console/lowcode-designer returns 403 in an existing solution |
The admin role does not have the AbpLowCodeDesigner.Default permission yet. This can happen when Low-Code is added after the database was already created. Re-run your migration/seed flow and verify the permission grant. |
| Admin Console also shows other management interfaces | This is expected when other installed modules expose Admin Console UIs. Use an explicit discovery allowlist if the product requires Designer-only composition; authorization and backend APIs remain separate. |
| Admin Console links to an omitted module from its home page | Check whether the installed Admin Console uses static home cards and Quick Navigation links. Link users directly to Designer or customize the Admin Console frontend when it still exposes static links; omitted routes return 404. |
React tests cannot resolve screen, waitFor, or fireEvent |
Inspect the Testing Library peer dependencies in the generated application. If @testing-library/dom is missing, add a version compatible with the existing Testing Library packages. |
| Designer opens but user lookups show raw IDs | The IdentityUser reference registration is missing from the initializer |
| React app has no dynamic menu items | The user is anonymous, useMenuItems is not wired into your navigation, or the signed-in user does not have any generated page permission |
| Dynamic routes do not resolve | createDynamicRoutes was not added to the router tree |
| Dynamic menu icons do not render | Font Awesome CSS is missing or you mapped icons differently |
Low-Code mutations redirect to /Error?httpStatusCode=400 |
The API exists, but the ABP antiforgery header is missing. Configure Axios to read XSRF-TOKEN and send RequestVerificationToken. |
DbMigrator exits with ABP-LIC-0020 although a secrets file exists |
Run it from the project directory that contains appsettings.secrets.json, or provide the license through the deployment's supported secret configuration. Never move the value into source-controlled settings. |
Studio already created Added_DynamicEntities_LowCode |
Inspect it and run has-pending-model-changes after completing the manual wiring. Do not create another migration when the final model has no pending changes. |